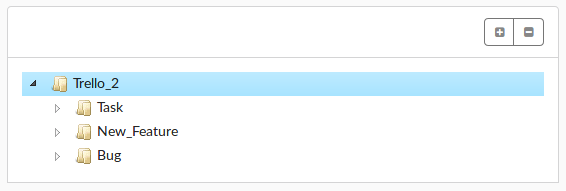
Trello has become central to how millions of teams work because it makes these teams more efficient. It allows teams to assign, track and complete tasks efficiently in a simple user-friendly solution. Effectively labeling tasks on Trello is crucial to the entire process as it allows us to easily group, track and manage tasks as they’re in progress, which is what makes Trello’s simple labeling feature so useful. But if you’re like us, sometimes labels aren’t added to cards for whatever reason, or the wrong label gets added and leads to a whole series of headaches. Here’s what a simplified list of Trello labels looks like:

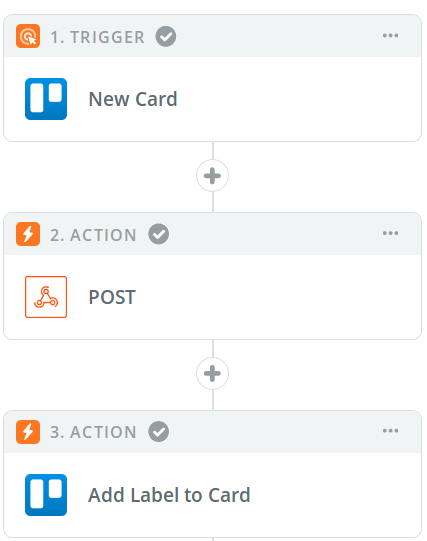
At AYLIEN, we’re big fans of two things: Trello; and automation. So we thought we’d show you how to build a Zapier app (or a ‘Zap’) to automatically tag or label Trello cards as they’re added to your board, all from within your browser, without writing a line of code. This Zap is going to have a simple, three-step workflow: when a card is added to a Trello board we make a call to our custom NLP model (using a POST request) to predict the accurate label for the card. We then add the label to the card. This is how it will look on Zapier:

Given the fact that every team will already have labels that they have come up with themselves, it’s not a good idea to use a standard list of labels (taxonomy) for this task. Instead we’re going to show you how to re-use you current label structure and build a custom NLP model. This model will learn from your previous behavior on Trello and accurately assign your labels to new cards in the future. This post will show you how to build that Zapier workflow in two sections:
- First, we’ll show you how to build your custom Natural Language Processing model.
- Then, we’ll walk you through building the workflow in Zapier.
1. Build a Custom Natural Language Processing model from your Trello cards
To automatically assign labels to your cards in Trello, you will need a Natural Language Processing model that can accurately predict what labels need be applied to each card. Instead of using an out-of-the-box text analysis model that would classify text according to pre-existing taxonomies, we’re going to build a model that uses a simple taxonomy - in this case, the taxonomy is the list of labels our team is already adding to cards. Usually, building a custom Natural Language Processing model would require a dedicated team of Machine Learning or NLP engineers at your disposal. But with the Text Analysis Platform (or TAP), you can do this without even leaving your browser. This will take three simple steps. First, we’ll gather data from our Trello board with card titles and labels. Then we’ll upload this data to TAP and build a model with it. Finally, we’ll click a switch and deploy the model as our own private API. So let’s get started!
Download your Trello cards to a CSV file
On each of your Trello boards, you’ll see a “...Show Menu” button on the far right of your screen, and under the “...more” section of this menu, you’ll find the option to “Print and Export.” Click on this button and select CSV as the format of your download (if you don’t have the business class version of Trello, add in the extra step of downloading as JSON and using a free service like JSON to CSV).

Once you have downloaded your Trello board, open up your CSV file and delete every column except the “title” and “label” columns.
Cleaning your Data
A key principle of building Machine Learning models is ‘garbage in, garbage out’. So once you have your data, you really should spend some time making sure it’s accurate. In this step, you’ll need to make sure:
- that every cell in the “label” column has only one label in it.
- that every label is attached to the correct task: if you see tasks that people have mislabeled, label them properly or delete the entry. Skipping this step means that your Zapier app will make the same labelling errors as your team previously did.
After this, save your CSV file and open up tap.aylien.com in your browser.
Upload your CSV file to TAP
TAP makes it really easy to create a dataset to train your model with. All you need to do is log in, click +Create Dataset, and then Upload CSV.

Once you have uploaded your file, a popup will appear with a Convert button, which will take you to the next step, where you’ll see a preview of your dataset. On this page, make sure you select whether or not your dataset has a header row, select Document for the column with the titles of your Trello cards, and Label for the column with the labels. In our example, we’ve built a model with three labels - Bug, New Feature, and Task. Your dataset of downloaded Trello cards may have much more than three labels, but for our purposes we’re going to keep it simple.
Change your labels to a format Zapier will understand
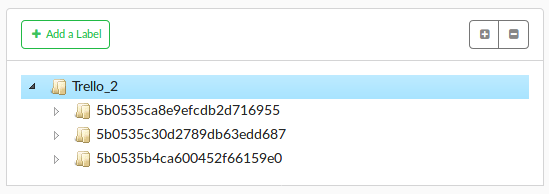
Now we need to make a change to this dataset: later in this process when your Zap tries to add a label to a Trello card, Zapier will need to know the Label ID of the label it adds. In other words, your Zap won't be able to find a label named 'Bug,' even if there is a 'Bug' label on your board, it will only be able to find the 'Bug' label by looking for its Label ID. This change might seem counterintuitive, but trust us - it will save you headaches down the line. To make automate this part of the workflow, you need to rename the labels in your Dataset from the labels you currently have (like 'Bug,' or 'New Feature') to their Label IDs (strings of letters and numbers). You can find the Label ID by adding '.json' to the end of your Board's URL, hitting CTRL + F, and searching for each label. Once you have the Label ID for a Label, replace the title of each folder in your Dataset in TAP with it's corresponding Label ID. So in TAP you'll go from this:

To this:

After this step, your can train your Model.
Train a model to predict what label to attach to new Trello cards
Once you have your dataset uploaded to TAP, you’re ready to train your custom Model. TAP will take care of all of this for you, all you need to do is to select what percentage of your data that your model will be trained on and whether you want to optimize for news content or social media content. First, click Split in the top right corner of your dataset’s page. After clicking Split, you’ll need to decide what percentage of your data you would like to use as training data and what percentage you would like to hold back for TAP to test your model on once it’s been trained. Anywhere between 5%-10% is acceptable for our task.

Once you’ve split your data, you’ll be asked what kind of content you want to train your model to analyze. Selecting the social media-style option is suitable for us here as it optimizes for shorter content like our Trello cards, instead of longer-form news-style content.
Test your model and deploy it as your own private NLP API
Once your model is finished training, you’ll be shown a variety of evaluation metrics, including f1 scores for each label, a confusion matrix and you can see how well it performs on example you give it. The interface looks like this:

Once you have built your model, you’ll notice its endpoint (a url) and an api key on the screen. You’ll use these later, so best to leave this screen open as a tab on your browser. TAP is currently in Beta, so you can train and test your models for free, and deploy one model without charge.
2. Build your Zapier app
Once you’ve deployed your model in TAP, open up Zapier and click Make A Zap at the top of the screen. You’ll be taken to the page where you’ll set up your App. On the left of the screen you’ll see each step that your app carries out, as well as the steps within each of these steps. This Zap is going to have a simple, three-step workflow:
- The Zap is triggered when a card is added to a Trello board
- We make a call to our custom NLP model to automatically label the card (using the webhook feature)
- We add the label to the cardspecify, an NLP model will predict the appropriate label for the card, which Trello will then add to it.
Creating your own custom Zap is really easy and Zapier supports tons of popular Saas products, Trello being just one of them. First, select Trello as the app on the first step.

Once you have selected Trello, you’ll be able to choose from the triggers that Zapier recognizes. We’re going to select ‘New card,’ which means that whenever a new card is created, your Zap will be triggered. After this, the next couple of steps involve telling your Zap which Trello account, boards, and lists you want it to listen to, and providing a sample Trello card that Zapier will use as an example while you’re building your Zap.

So now your Zap will be triggered whenever a new card is added to the lists you have specified, the next step is to set out what your Zap will do once it is triggered. We’re going to use Zapier’s Webhooks app for this, which are really easy to use.

To create the webhook, you’ll need to do two things. First, copy and paste in your model’s endpoint as the URL, and then under ‘Headers,’ you’ll need to declare enter your model’s application key, which you’ll find back on the model’s page:

Finally, under ‘Data,’ for the cell on the left, enter ‘text,’ and from the drop down menu in the cell on the right, select the name of the sample Trello card. This will let the webhook send the title of every new card as text data to TAP.

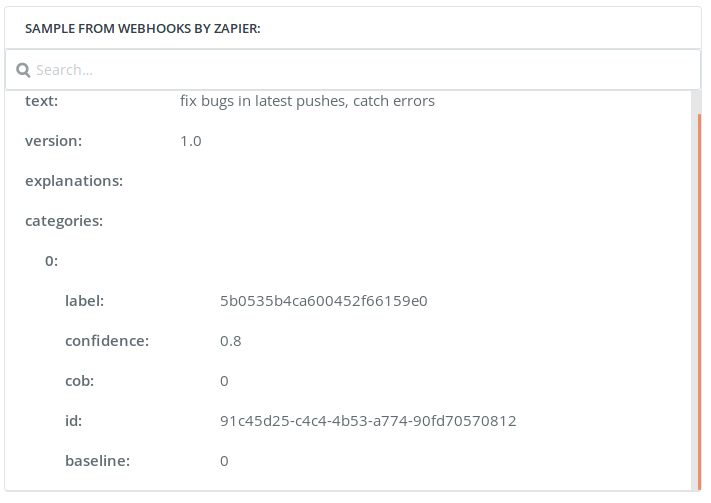
After you have set up your webhook, you can test your workflow up to this point. Zapier will take the Trello card and query your TAP model with the text on that card. For instance, we built a Zap using the sample Trello card with the task ‘Graduate from the incubator’, which predicted the Label ID that corresponds to ‘Task’ in our previous Trello labels examples.

Once you have completed these three fields in your webhook, hit Continue at the bottom of the page, and you can complete the third and final step of your Zap - adding the prediction made by your TAP model and returned by your webhook to the Trello card that triggered the Zap. For this, we’re once again going to select Trello from the list of apps. After you select Trello, you’ll be presented again with a list of actions your Zap can carry out with Trello, of which you’ll need to select “Add label to card.” This is where we’re going to tie the whole workflow together by selecting a label from step 2, and the card from step 1. To select the label your NLP model predicted, you’ll need to click ‘Use Custom Value’ from the options, and select the name of label of your model’s sample prediction in step 2. It should look something like this:

After this, you’ll need to tell your Zap exactly what to do with this label by selecting the example card from step 1. You can do this by selecting the Custom Value option again.
Once you’ve selected this action, you’ll see your Zap at work on your sample Trello card again, and with that, you’ve built your custom NLP-powered Zap! Add a card to your Trello board, leave it a few minutes (Zapier checks for new cards at maximum intervals of 15 minutes) and see your Zap automatically add your label to it.

This is just an introductory guide to using TAP to make a common workflow more efficient, but the applications of TAP are endless (for instance, check out how our CEO trained a model to block trolls on Intercom). If you want to want to build a TAP model for your own application, click on the link below to get your own free account.
Related Content
-
 General
20 Aug, 2024
The advantage of monitoring long tail international sources for operational risk

Keith Doyle
4 Min Read
-
 General
16 Feb, 2024
Why AI-powered news data is a crucial component for GRC platforms

Ross Hamer
4 Min Read
-
 General
24 Oct, 2023
Introducing Quantexa News Intelligence

Ross Hamer
5 Min Read
Stay Informed
From time to time, we would like to contact you about our products and services via email.

